Showing posts with label fermented food. Show all posts

Wednesday, April 19, 2017

Engaging in Nourishment

I've been attending a once-per-month breastfeeding support group this year, and it has been more than lovely. While nursing is obviously one of the topics we converse about, the over-arching purpose of this group is more a way to convene with other mothers and their children and support each other where we're each at. This morning we had some guided conversation, based on two questions:

1. What is your current struggle?
2. What are you currently creating?

I love the transparency that is required of both questions, particularly the first one. And I certainly was transparent today, and it was comforting to learn that others have dealt with similar struggles. It was great to discuss in a small group of like-minded women, and I'm leaving my answer to that question with them. But I would like to share my answer to the second question with a wider audience, because it is something I have started to try and become more and more purposeful about, and it is an ever-evolving and very important part of my life:

Food. Nourishing food, to be more specific. And a family culture that engages around it.

I LOVE to eat. My close friends know of this love, and many have seen me pack away more than my tiny frame looks like it can hold. Food has looked remarkably different in different stages of my life, and it's been since college that I've been on a quest to figure out what healthy eating means to me. After getting married almost four years ago, I reframed my thoughts about eating to learn how to plan for and feed two people. And now that Harrison is almost a year old and thoroughly enjoying solids, I'm reframing my thoughts once again.

While I am creating tangible meals for my family to eat, there is more to it than that.

These days my reframing has involved thinking about the purpose of the food that we are ingesting. Thinking about meals at the table where my family is being nourished not only through the food itself, but also through being in the same space, through the closeness of sharing both food and conversation together. I am trying to create a better culture of food in my family, where we eat to nourish our whole selves. Where the meals I have created are an aid in nourishing my family- nutritionally, emotionally, spiritually.

This means being more purposeful about meal planning, even when it sometimes feels like the bane of my existence (particularly when combined with budgeting). This means stealing moments throughout the day to chop vegetables to make dinner prep in the evening less time-intensive, even when I'd rather sit on the couch and zone out in the minimal time I get to myself. This means sitting down and chewing slowly, even when I can't help but think about everything that "needs" to be done before bedtime. This means putting phones away during meals, even though Instagram seems oh-so-alluring. This means engaging as a family unit around the table, making eye contact, asking meaningful questions, and enjoying conversation, even if it's 7pm and it's been a long day.

The meals I am creating these days have involved more and more "slow" food, if you will. I try to always have a ferment at the table- sauerkraut is a constant these days, fermented salsa once tomatoes are in season, pickles, carrots, what have you. These are foods packed away in mason jars that were prepared up to a year in advance, bursting with a flavor my palate has learned to enjoy. They nourish our bodies in the best way- feeding our stomachs with gut-healthy bacteria that aids in whole-body health. Slow food to me also involves cooking meals from scratch, buying less in packages, making every ingredient possible at home, and starting to take better advantage of the abundant farmers markets around Los Angeles (This rainbow burger is my current favorite creation based around many of these practices.)

I learned this morning, while discussing all of the above with the other women in the group, that there is an Ayurvedic concept called Agni- which is a term to mean "fire in your belly." From what I understand, it is said that the Agni of the person preparing a meal is put into the food being prepared, and so everyone eating the meal is also ingesting the Agni that was put in to it. So if you are preparing a meal and you have a negative Agni, you are feeding that negativity to everyone you have prepared the meal for. Conversely, if your Agni is rich and positive, that is what you are passing along while cooking. With this in mind, I want to be more purposeful and joyous while cooking meals. I do enjoy cooking, and do it out of love, but of course there are the days when I feel stressed, or rushed, or just not in the mood. I want to think about what I am doing while cooking, and come back to enjoying it more thoroughly, and in the process allow my positive Agni (if you will) to be shared in the food that I am preparing, and passed along to my loved ones at the dinner table.

Hippocrates is quoted as saying "Let food be thy medicine." I truly believe that the meals we prepare and the ingredients we use in them, along with the attitudes we have while cooking and eating and the space we hold at our dinner tables, is all supremely important for the nourishment of our bodies. I am continually working on creating a better nourishing culture of food in my household, and am looking forward to experiencing what this reframing of thought will lead to next.

Tuesday, February 28, 2017

Sour Sour Sauerkraut

I pulled a purple cabbage out of my fridge the other night, and as I started cutting it up and prepping it to make sauerkraut, I began to get excited for a day in the future when Harrison will help me with that task.

Oi, my kids are going to be so ... weird? The same type of weird as our little family, it's really all good, but I can kind of see it now ... the day Harrison realizes that his friends don't cut up cabbage and pour salt on it and squeeze and pound it until it is wilted and sitting in a self-made brine.

Hah, sorry buddy. But also not sorry.

It's actually because of Harrison that I'm even eating sauerkraut these days. I've never enjoyed the stuff, but real, raw, fermented sauerkraut is incredibly healthy- given the gut-enhancing properties of the beneficial bacteria and enzymes that form, and the vitamins that are already present in raw cabbage- and I wanted to set a good example for him, so I started making it and eating it. These days I find myself almost enjoying it, and Harrison willingly chomps down on it without making any faces. A success for now!

One wonderful thing about sauerkraut is that it is enormously nutritious while also very inexpensive. A three pound head of cabbage and about two tablespoons of good quality sea salt will yield almost two quarts of sauerkraut, with quick and easy preparation and then a waiting period to allow the beneficial bacteria to work its magic.

If I'm dreaming of my 10-month-old helping me with our household ferments in just a few short months, you have good reason to believe you can start some of your own today, and enjoy tangy, crunchy, healthy sauerkraut in just a few weeks!

Ingredients
•1 head of cabbage (3lbs or so)
•1-2 tablespoons of sea salt (I use coarse grey Celtic sea salt. Pink Himalayan also works well.)
•4 quart mixing bowl (or comparable)
•2 quart glass jar (I use two one-quart mason jars)
•glass weights (or comparable)

Method
1. Peel away any undesirable leaves from the cabbage, then cut off the end, slice in half, and remove the core. (If you're using a purple cabbage, take a moment to appreciate the beauty of it.)
2. Coarsely chop the cabbage to whatever size pieces you prefer. 1/2 inch wide ribbons or squares work well.
3. Layer the chopped cabbage and salt in the mixing bowl.
4. Put on a TV show or some good music and then get to work massaging the salt into the cabbage pieces, squeezing, pounding, pulling, whatever. Just play with it for a while.
5. After some time (10-15 minutes) you'll see the cabbage has become noticeably wilted and there will be some brine at the bottom of the bowl.
6. Tightly pack the cabbage into a jar and use glass weights, clean stones, or perfectly-sized cups, etc to push all of the cabbage under its brine.
7. Set the jar out of the way and once or twice a day be sure the cabbage is under the brine (it will form more brine, so don't worry if there's not enough the first day.)
8. Wait at least a week before removing the weights and putting a lid on the jar to transfer it to the fridge. You can wait months if you're patient enough; just eat when the flavor is right for you!

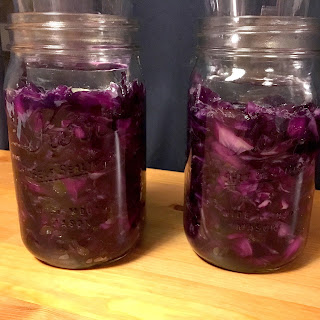
Please allow some poor quality iPhone photos solely for the purpose of illustrating the steps above.

marvel in the almost trippy beauty of purple cabbage

three pounds of cabbage, two tablespoons of salt, I promise it decreases in volume

finished product, with glass cups sitting on top to keep the cabbage below its brine

Happy fermenting!


Thursday, February 2, 2017

The Art of Kombucha

It's no secret that I love to brew and drink kombucha. At any given time, you can find at least two gallons brewing in my kitchen (and usually it's closer to four or five gallons). Kombucha is essentially the only beverage I drink besides water, and I love that with a little bit of work, I can have it on hand at all times, and have full say over the fermenting time and the quality of ingredients.

What is kombucha? In a nutshell, it is a fermented sweet tea. Its origins are not fully certain, but there are suggestions that it comes from Ancient China, around 220BC. Kombucha has been touted in many cultures for its health benefits; it is full of beneficial enzymes and gut-enhancing bacteria. Plain kombucha has a slightly sour and tangy taste to it, and flavoring leads to endless possibilities.

The most important part of brewing kombucha is a SCOBY. SCOBY is an acronym for "symbiotic colony of bacteria and yeast." A SCOBY is, in fact, a living organism. It looks like a translucent pancake, it feels a bit like firm jello or thick fruit leather. The SCOBY grossed me out for a short while, but I got over that quickly enough and now will even eat bits of it.

I've read plenty of how-to's on brewing kombucha, and I've found too many instructions call for it to be an exact science- test the pH, use this or that water temperature, sterilize jars with vinegar only, keep it on a heating pad, etc. I'm sure there's clout to those methods, but I don't use any of them. I invoke my inner hippie and brew my kombucha with love (and the occasional measuring cup). Brewing kombucha has become an art form in my household, and in two years I've yet to have a ruined batch. The instructions that follow are very specific, but only for the sake of them being in written word. This is a good way to start, and once you are comfortable with the process, take some creative leaps and find what works best for you!

Equipment
-a 1-gallon glass jar with a plastic lid
-filtered water
-1 cup of sugar
-1 tablespoon black tea, 2 teaspoons green tea (or 3 black tea bags and 2 green tea bags, or all black tea, or all green tea ... oh, here I go, already off the beaten path)
-1-2 cups of plain kombucha (starter tea)
-1 SCOBY
-a thin dish towel or cloth napkin, and rubber band

Process
1. Make a sweet tea concentrate: pour some filtered water into a saucepan, add one cup of sugar, and bring to a boil, stirring to dissolve the sugar.
2. Turn off the heat and add tea of choice, steep for at least 10 minutes.
3. Fill the gallon jar about halfway with filtered water.
4. After the tea has steeped long enough, add it to the gallon jar, straining out the tea leaves in the process.
5. Add starter tea to the jar, then finish it off with more filtered water up to 2-3 inches below the top.
6. The tea should be at or close to room temperature at this point, so now it is safe to add the SCOBY. With clean hands, gently place it on top of the tea.
7. Cover the jar with fabric, keep it in place with a rubber band, so that the SCOBY can breathe, but nothing can get into the jar.
8. Set it out of the way and out of direct sunlight for at least five days to let the fermentation process take place. Periodically taste the kombucha every so often after that until it is the taste you desire. Some people like to let their kombucha ferment for a few weeks so that it becomes very tart and vinegary, while others will drink it just as it starts turning from sweet tea. There's no wrong or right in the equation, just find your preferred taste. However, be mindful that the less time it ferments, the more sugar is still there.

Congratulations, you have made kombucha! But now what?

Remove the SCOBY and transfer to another glass container, bathed in plain kombucha and stored at room temperature with a cloth covering it. Save another 1-2 cups of plain kombucha to use as starter tea for your next batch. After that, you have a few options:

1. Enjoy the kombucha as-is. Put it in any sort of container and store it at room temperature or in the refrigerator. Take note that whenever kombucha is stored at room temperature in an air-tight container it will continue to ferment and begin to carbonate. Be careful with the types of containers you use to store it; glass containers with square bottoms are very weak and you definitely want to avoid them. You can use juice bottles, single-serve glass jars, mason jars, grolsch bottles, etc. I prefer to use bottles that have a screw-top cap, rather than a flip-top, so that if the kombucha ends up being extra fizzy, I have some control over stopping the overflow as I am opening it. I mainly use and reuse old GT's kombucha bottles.
OR
2. Flavor the kombucha. This is fun and it's a great part of the creative process. A good rule of thumb is to use a half cup of flavoring per gallon of kombucha. I never measure anymore and usually end up using much more than a half cup, but always to delicious results, so play around with it. You can use fruit, herbs, spices, simple syrups, citrus, vegetables, juice, whatever sounds good to you. I like to use ginger in almost all of my kombucha, along with a fruit. My favorite flavors are raspberry ginger and orange ginger. I have the best luck with using coarsely chopped frozen fruit. There are books dedicated to making specific kombucha flavors, so do some googling to find inspiration!
Method: after you remove the scoby and starter tea, add whatever you are using to flavor into the remaining kombucha, and tightly cover the jar with a plastic lid. Let sit for at least two more days, and then bottle the flavored kombucha, filtering first if needed. Take note of what I mentioned above in regards to the types of bottles used. Also take note that the extra sugars from the fruits, etc, will aid in carbonation, so the pressure/gas in the bottles will increase more rapidly. As always, fermentation will halt once you move the bottles to the fridge.

A few miscellaneous but helpful and important notes:

-The SCOBY should always be at room temperature, always be in sweet tea or plain kombucha, and always be able to breathe. This is in regards to when you are fermenting and when the SCOBY is just being stored.
-If you don't have any starter tea, a bottle of GT's plain kombucha works just fine.
-Avoid using anti-bacterial soaps around the SCOBY and kombucha. The SCOBY is made of bacteria- the good kind- but anti-bacterial soap does not discriminate! Kombucha relies on bacteria to exist, so you don't want to kill it all off. Clean your kombucha jars well, but don't worry about a sterile environment, it would do more harm than good.
-If you are trying to get a nice and fizzy final product, I've had the best luck with bottling in 16oz bottles and leaving them at room temperature for a few days before drinking.
-A new baby SCOBY will form with each batch of kombucha, so after a while you can peel a layer off and brew more than one batch at a time, or share the SCOBY love!

Happy brewing!